Training
Preparation steps
- Create a new Git repository from this repo and open it
- Open this template repo in a new browser tab and click
Use this templateand create a new repo from it
- In vscode, open
Terminalby selectingView -> Terminalto open the terminal - Clone your newly created repo:
git clone <URL to your repo>
- Open this template repo in a new browser tab and click
- Copy your Machine Learning code into the repository
- Copy your existing Machine Learning code to the
models/model1/directory - If you already have a
train.pyorscore.py, just rename the existing examples for later use as reference - If you are converting an existing
ipynbnotebook, you can easily convert it to a python script using these commands:pip install nbconvert jupyter nbconvert --to script training_script.ipynb - However, be aware to follow the
train.pyoutline with parameters for inputting the source for data path
- Copy your existing Machine Learning code to the
- Adapt Conda environment
- Case 1 - You are using
conda env- If you do not have an existing Conda env yaml file, run
conda env export > temp.ymlfrom the correct Conda env - Copy your existing Conda environmnent details into
aml_config/train-conda.yml(make sure to keep theazureml-*specific dependencies!)
- If you do not have an existing Conda env yaml file, run
- Case 2 - You are using a
pip- If you do not have an existing
requirements.txt, runpip freeze > requirements.txt - Copy your content from your
requirements.txtintoaml_config/train-conda.yml(make sure to keep theazureml-*specific dependencies!)
- If you do not have an existing
- Case 3 - It's more complicated
- Make a good assumption what your dependencies are and put them into
aml_config/train-conda.yml(make sure to keep theazureml-*specific dependencies!)
- Make a good assumption what your dependencies are and put them into
- Case 1 - You are using
- Update your training code to serialize your model
- Update your training code to write out the model to an folder called
outputs/ - Either directly leverage your ML framework or use e.g.,
joblib. Adapt your code to something like this: ```python import joblib, os
output_dir = ‘./outputs/' os.makedirs(output_dir, exist_ok=True) joblib.dump(value=clf, filename=os.path.join(output_dir, "model.pkl")) ```
- Update your training code to write out the model to an folder called
Running training locally
This is the target architecture we'll use for this section: 
- Adapt local runconfig for local training
- Open
aml_config/train-local.runconfigin your editor - Update the
scriptparameter to point to your entry script (default istrain.py) - Update the
argumentsparameter and point your data path parameter to/dataand adapt other parameters - Under the
environment -> dockersection, changearguments: [-v, /full/path/to/sample-data:/data]to the full path to your data folder on your disk - If you use the Compute Instance in Azure, copy the files into the instance first and then reference the local path
- Open
- Open
Terminalin VSCode and run the training against the local instance- Select
View -> Terminalto open the terminal - From the root of the repo, attach to the AML workspace:
az ml folder attach -g <your-resource-group> -w <your-workspace-name> # Using the defaults from before: az ml folder attach -g aml-demo -w aml-demo - Switch to our model directory:
cd models/model1/ - Submit the
train-local.runconfigagainst the local host (either Compute Instance or your local Docker environment)az ml run submit-script -c train-local -e aml-poc-local - Details: In this case
-crefers to the--run-configuration-name(which points toaml_config/<run-configuration-name>.runconfig) and-erefers to the--experiment-name. - If it runs through, perfect - if not, follow the error message and adapt data path, conda env, etc. until it works
- Your training run will show up under
Experimentsin the UI
- Select
Running training on Azure Machine Learning Compute
This is the target architecture we'll use for this section: 
- Create Dataset in AML with data
- Option 1 - Using Azure Storage Explorer:
- Install Azure Storage Explorer
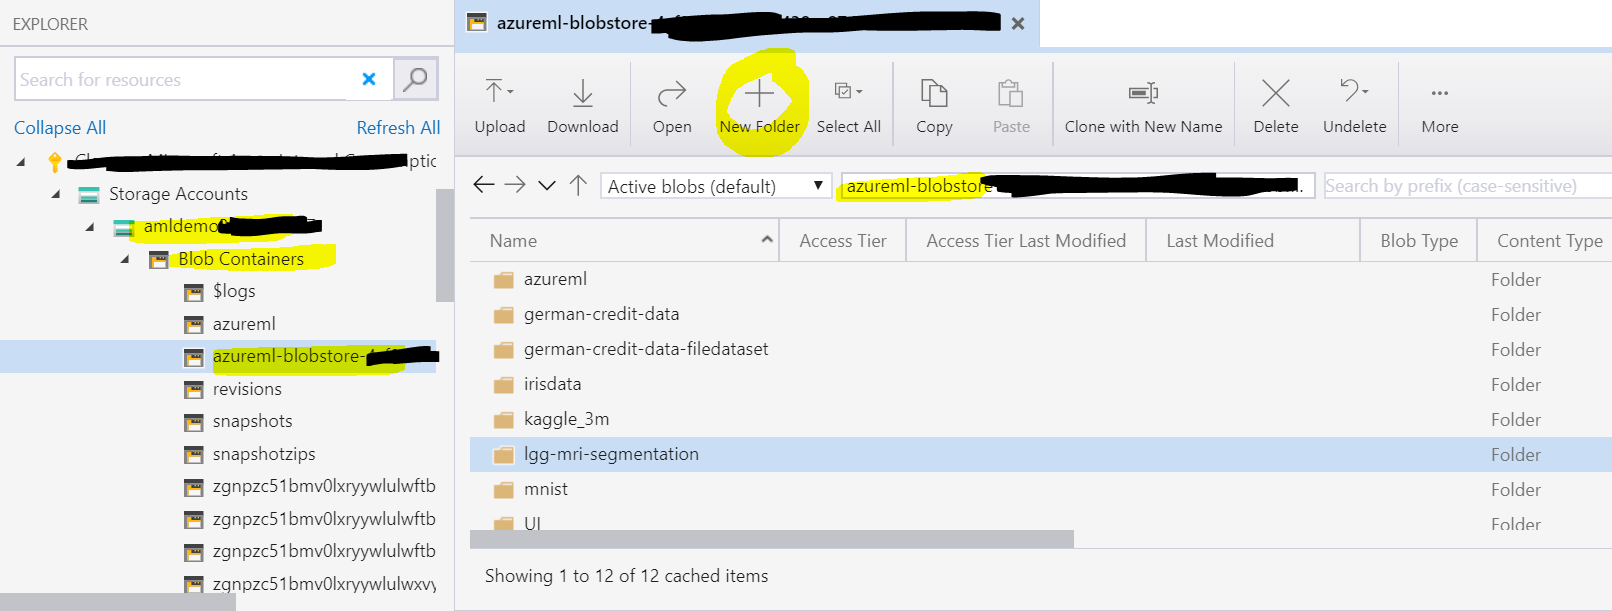
- Navigate into the correct subscription, then select the
Storage Accountthat belongs to the AML workspace (should be named similar to the workspace with some random number), then selectBlob Containersand find the container namedazureml-blobstore-... - In this container, create a new folder for your dataset, you can name it
training_data
- Upload your data to that new folder
- Note: For production, our data will obviously come from a separate data source, e.g., an Azure Data Lake
- Option 2 - Using CLI:
- Execute the following commands in the terminal:
az storage account keys list -g <your-resource-group> -n <storage-account-name> az storage container create -n <container-name> --account-name <storage-account-name> az storage blob upload -f <file_name.csv> -c <container-name> -n file_name.csv --account-name <storage-account-name> - In this case you need to register the container as new Datastore in AML, then create the dataset afterwards
- Execute the following commands in the terminal:
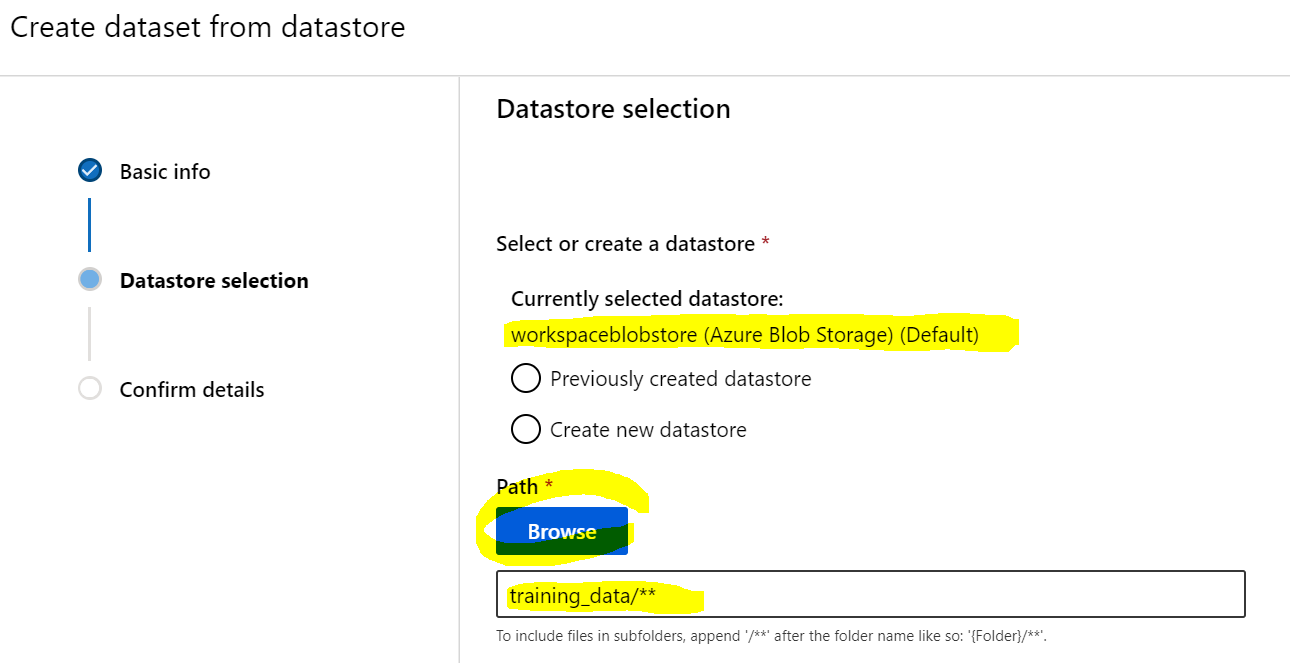
- In the Azure ML UI, register this folder as a new
File DatasetunderDatasets, click+ Create dataset, then selectFrom datastoreand follow through the dialog
- Lastly select the default datastore where we uploaded the data and select the path on the datastore, e.g.,
training_data
- Option 1 - Using Azure Storage Explorer:
- Provision Compute cluster in Azure Machine Learning
- Open Azure Machine Learning Studio UI
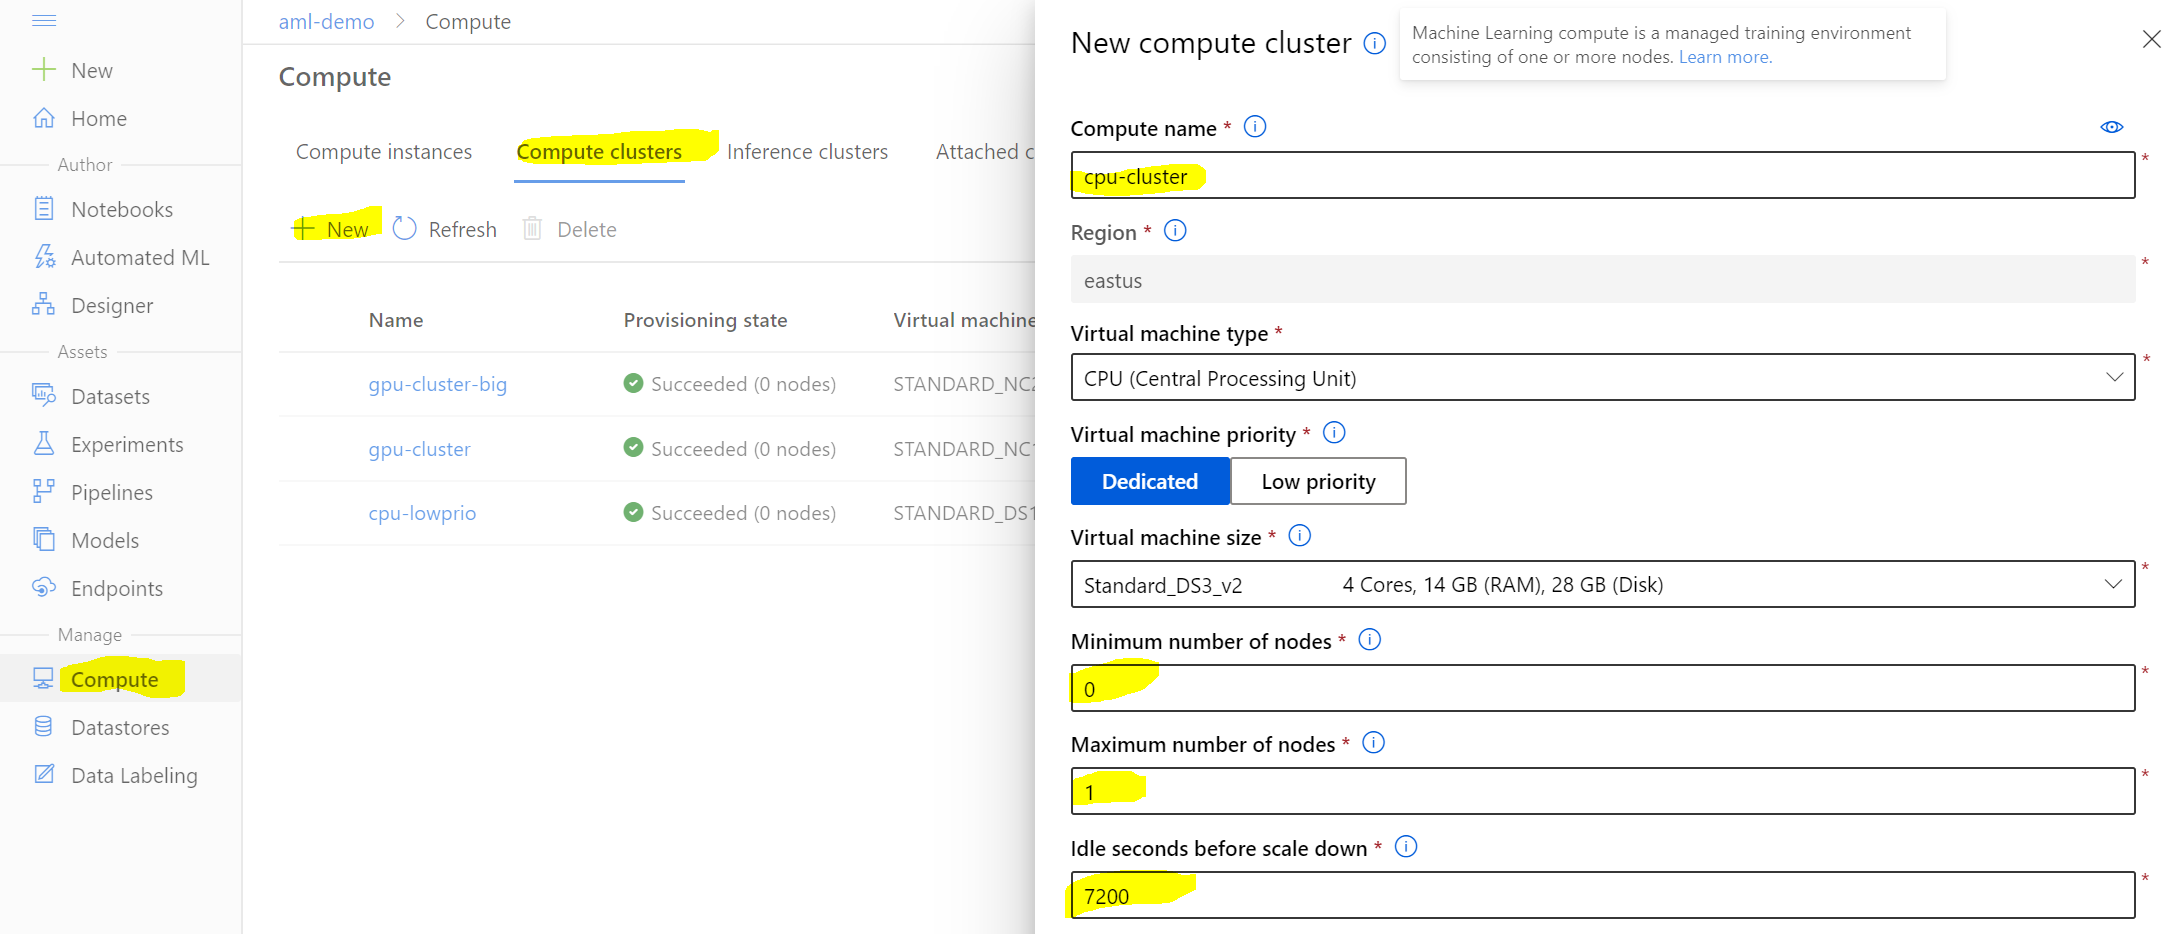
- Navigate to
Compute --> Compute clusters - Select
+ New - Set the
Compute nametocpu-cluster - Select a
Virtual Machine type(depending on your use case, you might want a GPU instance) - Set
Minimum number of nodesto 0 - Set
Maximum number of nodesto 1 - Set
Idle seconds before scale downto e.g., 7200 (this will keep the cluster up for 2 hours, hence avoids startup times) - Hit
Create
- Adapt AML Compute runconfig
- Open
aml_config/train-amlcompute.runconfigin your editor - Update the
scriptparameter to point to your entry script - Update the
argumentsparameter and point your data path parameter to/dataand adapt other parameters - Update the
targetsection and point it to the name of your newly created Compute cluster (defaultcpu-cluster) - Find out your dataset's
idusing the command line:az ml dataset list - Under the
datasection, replaceidwith your dataset's id:data: mydataset: dataLocation: dataset: id: xxxxxxxx-xxxx-xxxx-xxxx-xxxxxxxx # replace with your dataset's id ... pathOnCompute: /data # Where your data is mounted to - If you want to use a GPU-based instance, you'll need to update the base image to include the
cudadrivers, e.g.:baseImage: mcr.microsoft.com/azureml/base-gpu:openmpi3.1.2-cuda10.1-cudnn7-ubuntu18.04 - All full list of pre-curated Docker images can be found here - make sure your
cudaversion matches your library version
- Open
- Submit the training against the AML Compute Cluster
- Submit the
train-amlcompute.runconfigagainst the AML Compute Clusteraz ml run submit-script -c train-amlcompute -e aml-poc-compute -t run.json - Details: The
-tstands for--output-metadata-fileand is used to generate a file that contains metadata about the run (we can use it to easily register the model from it in the next step). - Your training run will show up under
Experimentsin the UI
- Submit the
Model registration
- Register model with metadata from your previous training run
- Register model using the metadata file
run.json, which is referencing the last training run:az ml model register -n demo-model --asset-path outputs/model.pkl -f run.json \ --tag key1=value1 --tag key2=value2 --property prop1=value1 --property prop2=value2 - Details: Here
-nstands for--name, under which the model will be registered.--asset-pathpoints to the model's file location within the run itself (seeOutputs + logstab in UI). Lastly,-fstands for--run-metadata-filewhich is used to load the file created prior for referencing the run from which we want to register the model from.
- Register model using the metadata file
Great, you have now trained your Machine Learning on Azure using the power of the cloud. Let's move to the next section where we look into moving the inferencing code to Azure.